.png)


Share


Visit Us

email us

 CLICK TO VIEW THE WHOLE PUBLICATION ONLINE
Brining the Turkey
(preparation should commence 1 day ahead of roasting)
First of all, you’ll need a thawed turkey, some kosher salt, a clean bucket or other vessel (with a cover) that will hold your turkey, water and some space in your fridge (in case it’s not cold enough outside).
Wash your turkey and remove any livers, necks, organ meat from inside the cavity. Place your turkey in the bucket and fill it with water until the bird is submerged. Now take your bird out of the water for a moment and add 1 full cup of kosher salt to the water and stir until the salt has thoroughly incorporated. You know have a brine.
Place your turkey back into the bucket, hold down the bird so that water enters the cavity and thus ensuring your bird stays submerged. Cover with the lid and keep in the fridge or outdoors if it’s cold enough. Keep your turkey in the brine for about 24 hours.
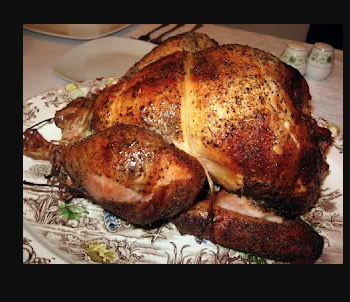
The next day, say 1 hour before you need to roast…clean your turkey. Remove it from the brine, rinse it thoroughly with cold water and then pat dry. Truss, season, treat your turkey using any method that’s preferred by your family. This method is about retaining a moist, roasted turkey. The rest is up to you!
There is so much info out there on cooking the perfect turkey and I’ve found Butterball’s website to be very helpful (they even have a toll-free line)! Try brining your turkey. I’ve been using this method for 10 years and the turkey has always ended up with the same moist, succulent results.
One last note before I move on to rotisserie turkey is that after you’ve allowed the turkey to rest and you’ve started to carve your bird, you’ll notice some of the meat is pink….relax! The brining of the turkey will cause some of the meat to turn pink but rest assured your turkey is well cooked. If unsure, invest in a meat thermometer and you can check the breast and leg meat for safe doneness.
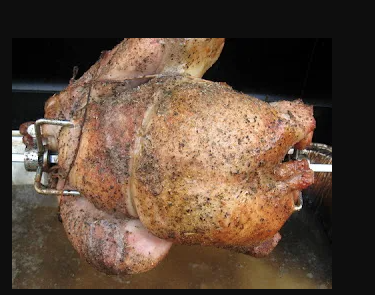
Rotisserie Turkey
Truss your bird. It will be rotating for hours and it needs to be secured so that wings and legs aren’t flopping around as it revolves.
Ensure that your gas grill is large enough to hold a turkey inside. Measure the dimensions of your grill (lid closed) and see if your turkey will freely revolve without hitting the inside of your grill’s lid.
Take out the grids and place a drip pan with water under your bird as it’s cooking. This method is VERY IMPORTANT. The drip pan with water will prevent grease drippings from smoking, discolouring your bird and ultimately prevent grease fires. Check & replenish water in drip-pan every 30 minutes or so.
Cook your turkey with the lid closed and use the “slow & low” method. My turkey took about 3 1/2 hours to cook and I maintained an internal gas grill temperature of no more than 325-350F.
Finally, I know I being repetitive but DO allow your bird to rest (20 minutes) before carving.
Happy Thanksgiving!
Μία “χαλαρή” συνταγή για την Ημέρα των Ευχαριστιών
Μαρινάρισμα της Γαλοπούλας
(η προετοιμασία πρέπει να ξεκινήσει 1 μέρα πριν το ψήσιμο)
Πρώτα απ’ όλα θα χρειαστείτε μια αποψυγμένη γαλοπούλα, λίγο χοντρό αλάτι (kosher), ένα καθαρό δοχείο (με καπάκι) που να χωράει τη γαλοπούλα, νερό και λίγο χώρο στο ψυγείο σας (σε περίπτωση που έξω δεν κάνει αρκετό κρύο).
Πλύνετε τη γαλοπούλα και αφαιρέστε συκωτάκια, λαιμό ή άλλα εντόσθια από την κοιλότητα. Τοποθετήστε τη γαλοπούλα στο δοχείο και γεμίστε με νερό μέχρι να βυθιστεί πλήρως. Βγάλτε τη γαλοπούλα για λίγο από το νερό και προσθέστε 1 γεμάτο φλιτζάνι χοντρό αλάτι. Ανακατέψτε μέχρι να διαλυθεί τελείως. Έτσι έχετε έτοιμη την άλμη.
Βάλτε ξανά τη γαλοπούλα στο δοχείο, πιέστε την ώστε να μπει νερό και στην κοιλότητα, διασφαλίζοντας ότι θα παραμείνει βυθισμένη. Σκεπάστε με καπάκι και κρατήστε τη στο ψυγείο ή έξω αν κάνει αρκετό κρύο. Αφήστε τη στην άλμη για περίπου 24 ώρες.
Την επόμενη μέρα, περίπου 1 ώρα πριν το ψήσιμο, καθαρίστε τη γαλοπούλα. Βγάλτε την από την άλμη, ξεπλύνετέ την καλά με κρύο νερό και σκουπίστε τη με χαρτί κουζίνας. Δέστε την, αλατοπιπερώστε την και ετοιμάστε τη με όποιον τρόπο προτιμά η οικογένειά σας. Αυτή η μέθοδος εξασφαλίζει ζουμερή ψητή γαλοπούλα - τα υπόλοιπα είναι στο χέρι σας!
Υπάρχουν άπειρες πληροφορίες για το πώς να ψήσετε την τέλεια γαλοπούλα, αλλά εγώ βρίσκω το site της Butterball πολύ χρήσιμο (έχουν ακόμα και δωρεάν γραμμή τηλεφώνου!). Δοκιμάστε το μαρινάρισμα - εγώ το εφαρμόζω εδώ και 10 χρόνια και κάθε φορά η γαλοπούλα βγαίνει ζουμερή και τρυφερή.
Τελευταία σημείωση πριν περάσουμε στη σούβλα: όταν αφήσετε τη γαλοπούλα να ξεκουραστεί και αρχίσετε να την κόβετε, ίσως δείτε κάποια κομμάτια να έχουν ροζ χρώμα. Μην ανησυχείτε! Αυτό συμβαίνει από το μαρινάρισμα αλλά η γαλοπούλα είναι καλοψημένη. Αν έχετε αμφιβολία, τοποθετήστε το θερμόμετρο κρέατος και ελέγξτε στήθος και μπούτι.
Γαλοπούλα Σούβλας
Δέστε καλά τη γαλοπούλα. Θα γυρίζει για ώρες και πρέπει να είναι ασφαλισμένα τα φτερά και τα μπούτια για να μην κουνιούνται.
Βεβαιωθείτε ότι η ψησταριά αερίου σας είναι αρκετά μεγάλη για να χωρέσει γαλοπούλα. Μετρήστε τις διαστάσεις με το καπάκι κλειστό ώστε να δείτε αν περιστρέφεται χωρίς να ακουμπάει.
Βγάλτε τις σχάρες και τοποθετήστε από κάτω ένα ταψί με νερό. Αυτό είναι ΠΟΛΥ ΣΗΜΑΝΤΙΚΟ: το ταψί με νερό αποτρέπει τον καπνό, το σκούρο χρώμα στο κρέας και κυρίως τις λιποαναφλέξεις. Ελέγχετε και συμπληρώνετε νερό κάθε 30 λεπτά.
Ψήστε με το καπάκι κλειστό, σε χαμηλή θερμοκρασία και αργό ψήσιμο. Η δική μου γαλοπούλα χρειάστηκε περίπου 3 ½ ώρες και κράτησα τη θερμοκρασία ψησταριάς στους 325–350°F.
Και τέλος - ξέρω επαναλαμβάνομαι - αφήστε τη γαλοπούλα να ξεκουραστεί τουλάχιστον 20 λεπτά πριν την κόψετε.
Καλή Ημέρα των Ευχαριστιών!
Gallery